Make a mobile bar for the garden
Comfortable and easy to move you can use it on the barbecue, the living room or place it near the pool. The mobile bar has shelves, bottle holders and can be stored during winter. It consists of slats whose implementation, apparently without fixations, requires patience and precision.
Materials & Tools needed
- Glue-laminated oak table, 160 x 80 cm x 22 mm
- Knotted oak slat, 27 x 27 mm, 2.4 m
- Knotted oak slat, 34 x 34 mm, 2.4 m
- Lot of 40 ears WOLFCRAFT
- Swivel castors with brakes, 80 mm
- Outdoor wood glue made of special materials SADER, 250g
- Lot of 16 round pozidriv SPAX steel screws, 6mm x 50mm
- Forged Hand Auger with Screw Ring for Wood, 3mm
- Twist drill bit for wood, 5 to 10 mm DEXTER PRO
- DEXTER POWER cordless drill, 12 V 1.3 Ah, 2 batteries
- Wired Circular Saw 1200 W
- Multimaterial drill bit, with drill diameter greater than 80 mm WOLFCRAFT
- Jigsaw with cable BOSCH Pst8500pel 530 W
- DEXTER roll-up plastic meter 5 m
- DEXTER green carpenter pencil
- 60 cm curved ruler


Step 1
Cut out the elements
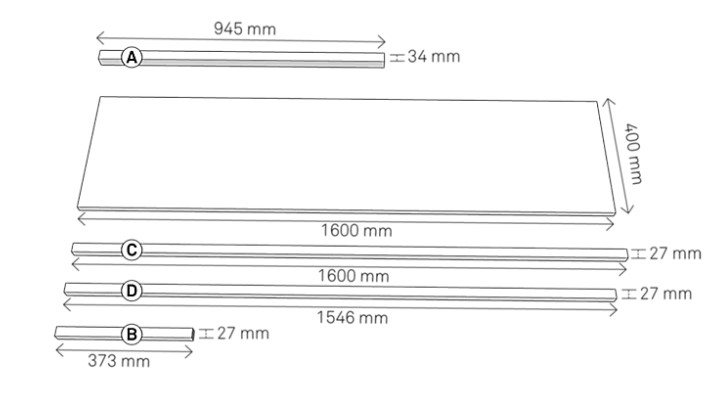
To assemble the 4 shelves of the bar cabinet, cut the two 22 mm thick oak veneers lengthwise into 2 equal parts 400 x 1600 mm.
Of the 3 slats of 34 x 34 mm and 2400 mm, cut:
- 5 slats (A) of 945 mm
Of the 18 slats of 27 x 27 mm and 2400 mm, cut:
- 30 slats (B) of 373 mm
- 15 slats (C) of 1600 mm
- 3 slats (D) of 1546 mm
Tip: For a precise cut, choose a circular or miter saw. Opt for a fine-toothed blade for a clean, splinter-free cut.
Step 2
Prepare the intermediate shelves
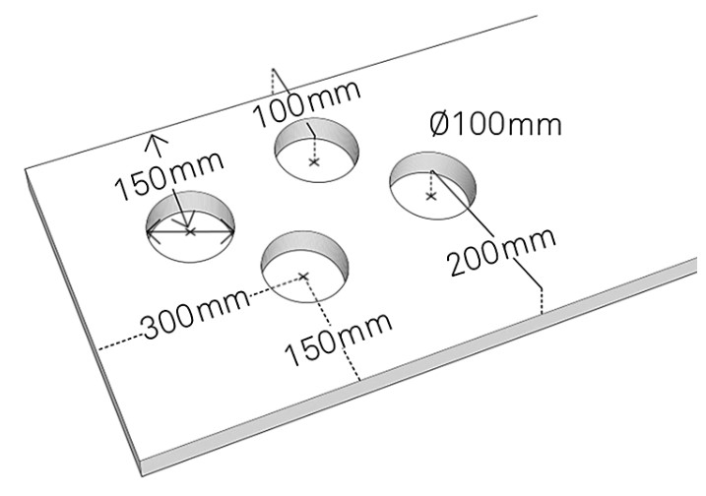
In pencil, draw on the two sheets that will form the two intermediate shelves, the location of the studs, following the drawing below.
Cut cleanly with a jigsaw or hand saw.
Step 3
Prepare the top tray
Trace the location of the bottle holders by forming four 100mm diameter circles on the top sheet.
Cut these circles clean, preferably with a hole saw.


Step 4
Prepare the uprights
Draw the axis of symmetry on one of the faces of each of the 5 ribbons (A) of the structure.
Mark on this axis the location of the holes in which the dowels will be placed to fix the slats (B) and (C), following the diagram below. The slats, 27 mm thick, will be spaced the width of a slat.
Attention! , holes 6 and 10 counting from the top correspond to the location of the shelves. The dowels will be placed on the other side of the ribbon.
Drill, approximately 20 mm deep , the frame slats at the marked locations. Use a drill bit whose size corresponds to the diameter of the 6 mm dowels.
Also mark and drill the two ends of each stud in its center at 25 mm.
Tip: When drilling, use a square to make sure your drill is vertical.
Step 5
Build the structure
Mark the holes in the middle shelves as well as the top and bottom trays.
Drill to a depth of 15 mm, with a 6 mm diameter drill bit , the 4 angles of the 2 upper and lower trays. Drill into the notches on the 2 intermediate shelves.
Starting with the intermediate shelves, glue the holes for the frame assembly with the wood glue and insert the dowels .
Attach the dowels to the ends of each stud after gluing the holes. Also glue the wooden surface of the lower part and join the structure with the upper and lower trays.


Step 6
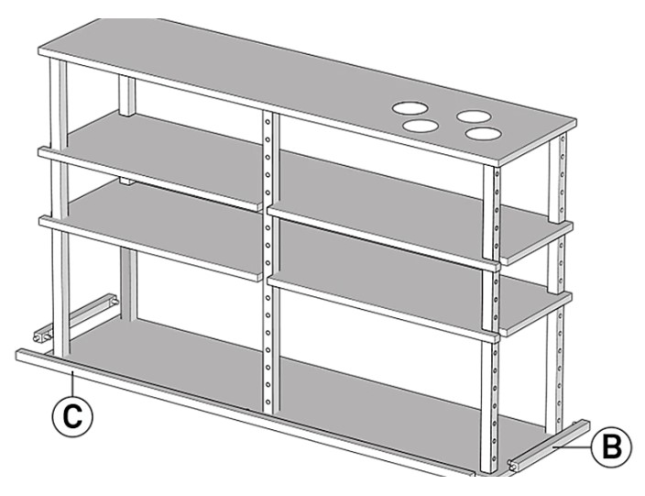
Assemble the first set of slats
Mark the location of the dowels on the small side slats (B) and then drill with a drill whose bit matches the diameter of the dowels.
Glue the holes to place the dowels. Then glue the corresponding holes in the frame and wire them together.
Mark and drill the location of the dowels on the front slats (C) .
Insert the dowels into the pre-glued holes.
After gluing the wooden surface at the bottom of the small slats, fit the large and small slats into the frame of the mobile bar.
Tip: Use a wood bit that matches the diameter of the dowels to pinpoint their location.
Step 7
Join the other ribbons
Place the slats (D) on the frame as shown in the drawing, and then make a fixing mark.
Pre- drill the slats with the help of a wood drill adapted to the size of the screws and then screw the slats to the structure.
Step 8
Fix the wheels
Lay the cabinet horizontally on the floor and install the caster wheels at all four corners.
Step 9
Protects finishes
Apply with a brush 2 or 3 layers of a protective varnish for exteriors or a color primer -insecticide and fungicide- in each piece of the furniture-bar following the manufacturer's instructions.
